
If you’re a fitness or gym aficionado, you’ve probably heard about hypopressive abs for a while now. There’s a good chance you’re not sure what these new abs look like and why they’re so trendy. It is usually said that hypopressive abdominals were discovered in the eighties of the last century and that their discoverer was Dr. Marcel Caufriez during his studies and research on uro-gynecological rehabilitation. Actually, this is not accurate. Dr. Caufriez did realize the potential of these abs in this type of rehabilitation, but in reality, this type of exercise has a tradition of millennia, as it has been practiced for centuries throughout Asia, as they are a fundamental part of some types of yoga.
Doing hypopressive crunches is a totally different exercise than the traditional crunches we all know. The latter are based on the training of the abs through physical stimulation through movement. However, by doing hypopressive abdominals, what we do is stimulate this area of our body through our breathing.
Doing hypopressive sit-ups offers great benefits to athletes as it allows you to expand lung capacity, reduce the waist and strengthen the pelvic floor. The last two characteristics of these abs explain why they are often used for postpartum recovery. The strengthening of the pelvic floor occurs reflexively through the postures and breathing typical of this type of abdominal. If you’d like to start doing hypopressive sit-ups but aren’t sure how to do them, you’re in luck as we’ll explain it step by step below.
What do you need to do hypopressive crunches?
- Yoga mat
- Comfortable clothing
- A mirror
Instructions for Doing Hypopressive Crunches
- Once you have decided to take the step and dare to try doing hypopressive sit-ups – which I recommend since it is an exercise with many benefits – you should keep in mind that the most important thing to perform them correctly is the correct position. For this reason, all your interest should be located in the body position that you must acquire, there are many postures to do this type of sit-ups, but all of them have a series of points in common that are what make the exercise have the desired effect. For this reason, I am going to insist a lot on each of them, although I will also explain, at the end of the article, some of the most common positions.
- First of all, you must acquire a relaxed posture. The first pose you’re going to perform will be standing. This way you will be able to pay attention to every detail and later on, when you are able to repeat the pose with ease, you will be able to perform other more complicated postures. Stand with your feet about the same distance apart as your shoulders.
- Pay close attention to your pelvis. To do hypopressive crunches you will have to move it forward slightly to stimulate the pelvic floor. The best way to do this correctly is by trying to visualize your tailbone. The tailbone is the last bone in the spine. It is slightly curved and usually points downwards. You want it to point slightly forward. As you may have noticed, when trying to do this, your pelvis will have moved forward slightly. This is the position you should try to maintain all the time.
- Now look at your shoulders. You should try to pull them back a little but without changing the rest of your posture. Just bring them back slightly. You’ll notice how your chest moves forward as you do so and how your lung capacity widens
- Next, you should pay attention to your chin, which should point slightly downwards. You should aim it at your neck. Remember that the movement should be very light and at no time should you feel muscle tension.
- Finally, you should bring your whole body forward slightly. Normally, our body is positioned perpendicular to the ground, forming an angle of ninety degrees. You should lean forward slightly (without losing your balance).
- You’re now ready to start the exercise.
- The first key to performing these crunches is posture, as I said before. The second is breathing, as you might have guessed. What you should try to do is inhale as much air as possible through your nose. When your lungs are full, you should block the entry and exit of air (in your first attempts, to understand the movement you can help yourself by covering your nose) and pretend to breathe. By doing this while your airways are closed, you will notice how all the air inside you rises to the highest area of your lungs. That is the desired movement that is going to help us so much. When that elevation occurs, your rib cage expands its capacity. On the other hand, the lower part of your lungs contracts and retracts inwards. As you may have noticed, this area coincides with your abs.
- Look at yourself in a mirror. This will help you understand the movement. Your abs should be contracted inwards and you will notice that the circumference of your waist has been reduced. However, the rib cage and chest are fully expanded and filled with air.
- You want to keep the air trapped for as long as you can. The more the merrier. When you need to breathe, expel all the air through your mouth and relax your entire posture.
- Perform several repetitions.
- This is the most common pose, but there are others that we detail below.
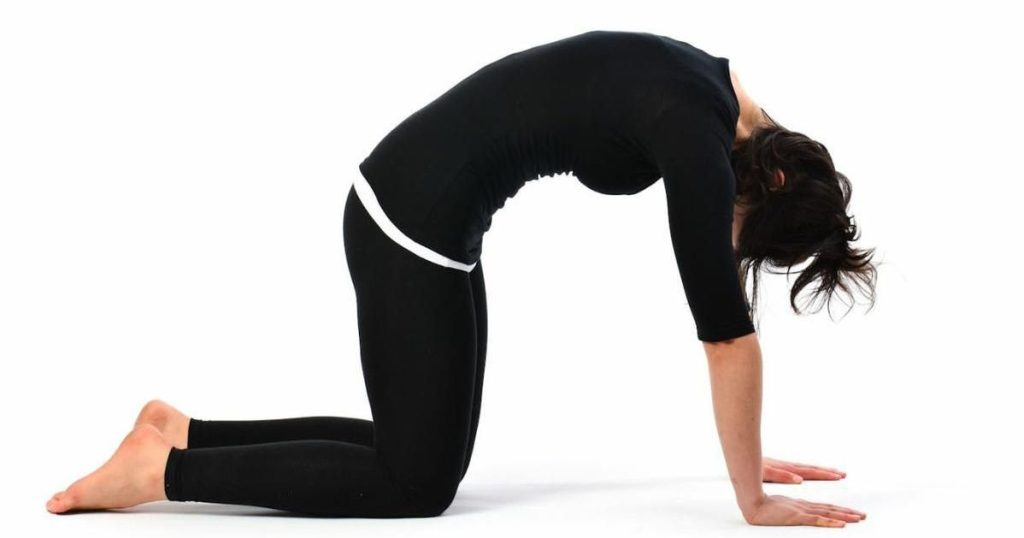
- On all fours: resting on the ground with our hands and knees. Remember to bring your pelvis forward, pull your shoulders back, and lower your chin. These three points should be repeated in all postures
- Face up: with your knees bent and your feet flat on the floor. We will raise our arms towards the ceiling and place our palms at a ninety-degree angle parallel to the ceiling. You should think of yourself as exerting force against something, as if you were trying to lift or hold the ceiling.
- On your knees: with your arms extended at a ninety-degree angle and your hands raised with your hands parallel to the wall. Imagine you’re pushing the wall. Also, remember to lean forward slightly like when you did the first standing pose.
- There are many more postures. You can do them as you progress in your workouts. Always remember to keep the three fundamental position points and lean forward.
Tips for doing hypopressive crunches
- During the first few days when doing hypopressive sit-ups, it is quite common for you to feel dizzy. This is due to the breathing effort you are exerting. You shouldn’t panic as it’s a very normal thing to do. You just need to take a little break.